Monday, November 29, 2010

RHC: Ladyfingers and Lemon Canadian Crown

Lemon Canadian Crown
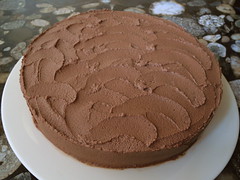
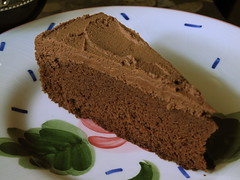
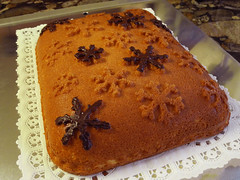
I was traveling over Thanksgiving, which made my cake-of-the-week for the Heavenly Cake Bakers switch from a centerpiece dessert for the big meal to a half-size version stuck in at the tail end of the weekend. That's a pity, because this is a lovely party (or holiday) dessert. Even better, it can be completely made ahead of time and frozen for up to 3 weeks. I'm making notes for some future occasion--this cake will be made again. Another advantage is that the cake can be made in stages, and I used that to squeeze it in after returning from my Thanksgiving trip. (The Folks Next Door and I went to older brother's house in North Carolina. We carried up the cranberry-orange relish and the squash-cheese casserole and I helped with some cooking and made the turkey chowder while there, but it was nice to not be a principal cook for the big meal for a change.)


Ladyfingers
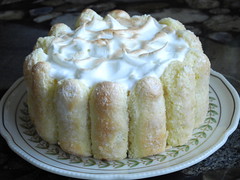
Before I left, I tackled the ladyfingers. These can probably be bought somewhere in Atlanta, though I've never noticed them in the stores. (I suspect that's because I've never looked.) I found them surprisingly easy to make. I did start by watching Rose's video on YouTube as a warm-up for piping ladyfingers, and that was very helpful in figuring out the cookbook instructions on drawing guidelines for the piping. My finished ladyfingers were a little undersized as I didn't have a pastry tube quite as large as the 3/4" specified (and I didn't squeeze my pastry bag as much as Rose did in the video), but that is all to the good as I planned to use them for two half-sized cakes: this week's Lemon Canadian Crown, and Tiramisù. I didn't even have as much trouble as I expected with the piping, and by the time my ladyfingers were baked, they looked, well, not like store-bought, but pretty darn good. Once baked and cooled, I wrapped the ladyfingers and my 6" disk (for the cake base) up in heavy-duty plastic wrap and popped them all into the freezer.


Lemon Canadian Crown
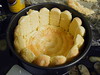
I constructed the half-size Lemon Canadian Crown in a 6" springform pan, which is a little less than half the capacity of the 9" pan called for. The smaller diameter made it somewhat hard to fit in even my smaller ladyfingers, but with a little pressing against the side of the pan the ladyfingers eventually formed a lining. Next was to wedge in the trimmed ladyfinger disk for the base, and that helped hold the sides up once in place. The lined pan then got stuck in the freezer while I made the filling.

Lemon Canadian Crown
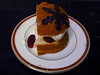
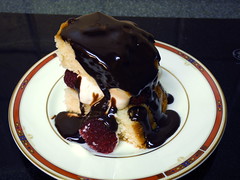
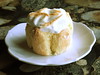
The filling is a lemon curd made with whipping cream instead of butter. My curd took much longer than specified to thicken--about 40 minutes, not 15. The temperature stayed low even when the curd started to thicken, and I finally went with the consistency test even though temp was only 170. Strained into a large glass bowl, the curd cooled quickly, and then I folded in softly whipped cream. This mixture went into the ladyfinger shell and back into the freezer. Not all the filling would fit in the prepared pan, so I grabbed 3" soufflé molds, cut more ladyfingers in half to make an outer ring to line the sides, and filled them with the leftover lemon. In the little soufflés there was much more ladyfinger to the amount of lemon, and I ended up with 4 mini desserts.

The last step once the lemon is completely frozen is to make a meringue, spread it to cover the frozen filling, then run the cake briefly under the broiler to brown the meringue. Once that was done it was back to freezer to let the frozen parts recover from the heat blast.

Lemon Canadian Crown
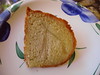
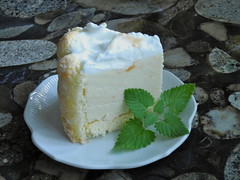
Tasting results: My brother thought the ratio of ladyfingers to filling was skewed too far toward ladyfingers, but we both thought that was a problem of the half-size version, and a 9" cake would be fine. Older niece devoured one of the soufflé dish versions and departed for her homework without comment. Younger niece ate the meringue first because she didn't like it much, then finished the rest with appreciative notes. Nephew thought the ladyfingers were too dry (it was his first encounter with plain ladyfingers, not buried in tiramisù) and left the base uneaten. Personally this is right down my alley, nicely lemony, not too sweet--a lovely dessert.

Monday, November 22, 2010

RHC: Chocolate Génoise with Whipped Peanut Butter Ganache

Chocolate Génoise/PB GanacheThis should be an easy cake, at least now that I'm fairly comfortable with génoise. However, things just didn't go my way with this week's cake-of-the-week. The génoise was not too bad, the main flaw being that as usual, my batter didn't have the full expected volume. I think I've got a two-fold problem. First is that I need to continue to work on my folding technique so I don't lose the lovely volume from the beaten eggs. Second is speed--I think I'm folding too long (see #1), then also being too compulsive about scraping all the batter into the pan and otherwise dallying while getting the cake into the oven. I need to work on that TV chef style where utensils and pans with lots of the ingredients covering them are tossed willy-nilly into the sink, while the chef moves on in the recipe.

All that aside, I did get the chocolate génoise baked, and prepared the syrup with Chambord. (Unlike several Heavenly Cake Bakers, I had a dusty bottle in my liquor cabinet from some long-ago baking endeavor so didn't have to break the bank to get a new bottle.) Then it was on to the peanut butter whipped ganache. This should also have been simple--ganache has no terrors for me, and this recipe is just ganache with some peanut butter added, then whipped. Well, it was the whipping part that did for me. I carefully checked the temperature, but nonetheless when I started to whisk the mixture it seemed impossible to get soft peaks. I continued whisking and ended up with a grainy ganache. Rose says such a ganache can be rescued by re-melting it then beating it again, and indeed when I remelted it and got it to the right temperature it looked just like it had when I started. Unfortunately, it also once again never produced anything like soft peaks and quickly turned grainy. I gave up and frosted my syruped génoise with it anyway. It did have a nice light texture, so all that was affected (as far as I could tell) was the appearance.

Chocolate Génoise/PB GanacheTasting results: not many opinions from the home front this week. Personally I thought it was good, with a nice light texture and well-balanced flavors. Peanut butter can be very "in your face", but this one is nicely balanced with the chocolate. However, it's still a génoise, and I strongly prefer butter cakes, especially the dense pound-cake styles. As far as the folks next door--sister-in-law and older niece dislike peanut butter and declined to taste (SIL did try a nibble, and found the PB to be at a very objectionable level). Younger niece tasted and declined any more. Nephew, a PB fan, presumably ate the piece I sent over to him but I didn't get a report. My brother didn't ask for any (and I forgot to offer it)--actually, I'm not sure how he feels about PB.

Office opinions: a big hit. My supervisor called it the best cake-of-the-week he'd had. (He does have a limited sample size, as his office isn't on my regular Cake Distribution Route. <g>) P, who hadn't had a cake-of-the-week before, loved it (he started out asking if it was a mix, and the concept of frosting not from a can seemed rather foreign to him), as did B and V. C, like me, prefers the butter cakes and gave it an "OK". Still, I think we'll call it a success.


Saturday, November 20, 2010

Clay's Multi-Grain Sourdough Sandwich Bread from KAF

Clay's Multi-Grain Sourdough Sandwich BreadDespite the high reaching almost 70 today, my brain has moved to "winter" mode and my cooking urges reflect it. I'm making soups, comfort food casseroles, and baking bread--more than the weekly challah, that is.

Today's bread is from a recent King Arthur Flour blog post (or just see the recipe), which also inspired me to go revive my rather evil looking sourdough starter. After feeding it yesterday I left it out overnight, and today it was very bubbly and ready to go. Don't know if it was the freshly revved up starter or other substitutions I made, but this bread didn't much resemble the description in the KAF writeup.

First let me document the substitutions: I used more whole wheat flour than called for (3 oz. instead of 2), reducing the AP flour. I don't have the "KA Whole-Grain Bread Improver" but added some vital wheat gluten instead--I see on further research that the bread improver is a mix of vital wheat gluten and soy flour, mostly. And I don't have the KA Harvest Grains Blend, so I mixed some poppy, flax, and sunflower seeds into a little Bob's Red Mill 5-Grain Cereal blend, which is an oat/wheat based hot cereal. Seemed close enough.

Clay's Multi-Grain Sourdough Sandwich BreadWhat was different? Well, I needed a good bit less AP flour than the minimum in the recipe, and then added more water during the knead as the dough didn't look nearly as wet as the blog pictures. OK, it's winter, and we're dealing with a sourdough starter with variable water amounts, so I give that a pass. But then it says "Cover the dough, and allow it to rise for 1 1/2 to 2 hours; it'll become puffy, though it may not double in bulk." Mine was tripled in a little over an hour when I first checked on it. On the second rise I let it get about 1-1/2" above the pan (and again it was much faster than the recipe), and it was over-risen and sank some on baking. Last thing was the texture, but here we're definitely in the subjective realm. They said "chewy texture of an artisan loaf", I'd say it's got a little more structure than a sandwich bread. Or maybe I just don't eat anything but artisan breads these days, if you don't count the whole-wheat challah.

Despite all that, it's a nice loaf of bread. Very light on the "multi-grain" bit, so I'd probably up the whole-wheat flour even more if I make it again, especially as it's clear the loaf has plenty of spring to handle it. The character could be varied quite a lot by using different seeds and grains for the Harvest Grains Blend.

Sunday, November 14, 2010

RHC: She Loves Me Cake--sort of

She Loves Me CakeIt's a free choice week for the Heavenly Cakes bake-along, and my list of "cakes Marie has baked and I haven't" is getting pretty short. Well, I think it's at eight cakes, so maybe not quite that short. Anyway, at the top was the She Loves Me Cake, which was the second cake Marie tackled. A little negotiation with younger niece to incorporate chocolate in the presentation, and we had a plan.

The result didn't look much like "She Loves Me" cake, though. First off, my flat decorative NordicWare baking pan is the snowflake design instead of the daisy--more appropriate for this time of the year, really, even though Atlanta may not see snow until February (or not at all some winters). Rose gives options of splitting the cake and filling it with lemon curd and blueberries (the Lemon Daisy Cake) or with whipped cream and berries (Berry Shortcake). I wanted to use the berry shortcake option (though I prefer a slightly sweet biscuit for a real strawberry shortcake). With this need for chocolate this week, raspberries seemed like a good choice for the berries. And that chocolate requirement....the hot fudge sauce from the ice cream cake was really yummy, and pretty easy. That'd do. Maybe my She Loves Me Cake is "Chocolate snowflake raspberry shortcake with hot fudge sauce".


She Loves Me CakeThis cake is on the quick and easy list, and my only slight reservation about that rating is that it's an egg-yolk only cake. That doesn't make the preparation harder, but I find the excess egg whites to be an annoyance despite all the Heavenly Cakes that have needed them. Egg separating aside, the cake mixes up very quickly using Rose's butter cake technique of adding the butter and some liquid to the dry ingredients, then adding the egg mixed with other liquid ingredients. I spread the batter in my snowflake pan, and it was into the oven. Despite my setting my timer for 5 minutes under the baking time, the cake had started to pull away from the sides of the pan when I checked it. My sister-in-law felt the cake was again a little dry (I didn't notice myself, but that might have been the presentation), and perhaps that touch of over-baking did it.

I cooled the cake and made the fudge sauce, then asked younger niece to come over and experiment with some decorations to highlight the snowflake design. As we were adding chocolate, I melted a little 62% chocolate and handed her a small paintbrush, and she put a chocolate coating over a few of the snowflakes.

She Loves Me CakeThat was it, except for the assembly. I cut cake squares, split them in half, and put raspberries on the bottom piece. A healthy (ha!) glob of whipped cream covered the raspberries, then the other piece of cake went on top. Finally I drizzled warm fudge sauce over the top.


She Loves Me CakeTasting results: Sister-in-law noted a little cake dryness, as above, but had found a little whipped cream easily dealt with the problem. My brother said the cake made a nice platform for the other components. :) The kids chimed in with 'really good', and I failed to get the picture of younger niece licking the last of the fudge sauce off her plate.

I did make an effort to judge the cake separately from the berries, cream, and chocolate, and really liked it. It has a lovely even crumb, a nice vanilla flavor, and a good yellow color from the (5+) egg yolks. I'd eat it plain, or jazzed up any number of ways--the lemon curd idea will be one of them, I'm sure.

Monday, November 8, 2010

RHC: Swedish Pear and Almond Cream Cake

Swedish Pear and Almond Cream CakeI'm back baking in real-time, after posting on baking I'd done in advance of three weeks of travel. There was the annual trip to exhibit at the ag. show, one day at home, my 9-day vacation at Disney World, one day at home, and a trip to Reston, Va. and Washington, D.C. for meetings. I'm glad to be home this week! The post will be short, though, because I'm still trying to recover my brain, lost somewhere in all that travel.

Cake of the week is the Swedish Pear and Almond Cake, a sour cream cake with a band of almond cream (almond paste, sugar, and egg) and a layer of pear slices. Theoretically, the layers of almond cream and pears, applied to the top of the cake batter, sink during the baking to end up at the bottom--which becomes the top as you turn the cake out. In actuality, my pear layers stopped about half-way through the cake, though the almond cream did end up on top.


Swedish Pear and Almond Cream CakeOverall it's a very easy cake, except for cleaning up after using the food processor for the almond cream and the stand mixer for the cake batter. It rose beautifully and turned out easily, and the design of the Bavaria bundt pan I chose showed up nicely. Tasting results were good too--I found it a moist cake with good flavor, almost a pound cake texture (which I love), though I could wish that mine hadn't ended up with essentially 3 zones: the plain cake, the pear layer, and the two bites of almond-y goodness. It didn't integrate well, though each bit was tasty on its own.

Other tasters' comments mostly stuck to "good cake", with the exception of one friend who was wanting a different cake. When I told her this was a pear and almond cake, she was expecting more the style of the apple upside-down cake or the plum and blueberry torte--half cake, half fruit. That is not this cake. :)

Monday, November 1, 2010

RHC: The Bostini

The BostiniI have a feeling that the Bostini, for many of us, is the most delectible picture in the book. This "re-imagined Boston cream pie" caught my eye time and again as I flipped through for some other cake-of-the-week, and I'd pause to look at the chocolate dripping down the sides of that cappuccino cup, maybe read a little bit of the recipe to see what the pieces were, then would flip on to another page. But now it's time for the Bostini itself.

As is my usual approach I did a half recipe, and for this individually composed dessert, I wanted half-sized servings--all the adults in the family are watching our weight, and while the active teenagers don't need to, they also are fine with smaller dessert sizes. Half-size seemed about right.

What to serve this in? Part of the reason the photograph of the Bostini is so attractive, I think, is the chocolate sauce flowing down the sides of the cappuccino cup used for serving. However, my practical side said that would be incredibly messy to eat--the cupcake would be pushed down into the pastry cream with the first few bites, sending (more) chocolate sauce and pastry cream cascading over the sides of the cup. Rose notes that if you have the right diameter of cup the cupcake will act as a stopper to keep the cream from running out of the cup, but I didn't have much choice of container diameters. Besides, I was going to have a half-sized portion, so coffee cups were out. After a scan of my cabinets, I decided on some slender 6 oz. white wine glasses (I had 4 of those) and custard cups for the rest. The custard cups weren't a good idea, as it turns out, for exactly the problem I'd thought of with the cappuccino cup. The wine glasses, on the other hand, were just right.

The first step was to bake the orange glow chiffon cupcakes, and for my half-size servings I couldn't use the specified cupcake pan. I went with a mini muffin pan. However, mini cupcakes are a lot less than half of a "regular" cupcake, so I ended up with 24 or so mini chiffon cakes. I was shooting for 8 half-sized servings, so decided that I'd use 2 mini chiffon cakes per.

The BostiniOnce the cakes were baked, it was on to the pastry cream. Rose describes it as a cross between a pastry cream and a crème anglaise--less cornstarch, richer, and much less sweet than a usual pastry cream. I created quite a mess of my island counter top by spilling part of the egg mixture over it while doing the juggling act to mix a little hot cream into the eggs, then mixing all the eggs into the cream, and not ending up with scrambled eggs. (No scrambled eggs, indeed, but lots of items on the countertop collected a coating of egg along the way.) However, the amount of egg lost to the spill must not have been enough to be a problem, as my pastry cream thickened nicely. After straining the custard, I poured it into the 4 wine glasses and 4 custard cups, and tried to put plastic wrap on the surface of each one. That's when the narrow wine glasses became a problem--it was very hard to maneuver a little piece of plastic wrap into the glass and onto the surface of the custard.

The last component is the chocolate butter glaze, basically equal weights of dark chocolate and butter. I used a ganache instead of the chocolate butter sauce. I'm sure the butter sauce would be wonderful, but I love ganache, too, and did you know that heavy cream has half the calories of butter, tablespoon for tablespoon? <g> I did use the same amount of cream in my ganache as butter called for in the chocolate butter sauce.

To compose the Bostinis, I put two of the mini orange chiffon cupcakes into each container with the pastry cream, and pushed it down a little. Then the warm chocolate sauce was poured on top--but not dripping down the sides, as my wine glasses had enough room to contain it.


The BostiniThis one is another unanimous hit, even from younger niece with her anti-cream/dairy attitude. (Which, you may recall, does not extend to whipped cream, so I suspected pastry cream would be OK.) She did ask if she could just have a wine glass full of the ganache, but being refused that, she ate a Bostini with no problem. There was some difficulty in eating them even from those who got the wine glasses--the chiffon cupcake was a little hard to cut into bites with a spoon. Perhaps I should have let them soak in the pastry cream for a while before serving, but in the end, one way or another, no one had leftovers in their cup.